Tag Angels
Copyright © Charlieonline.it 2002 - 2026All Right Reserved

Return to Tutorials
Please read my TOU's HERE
Copyright © Charlieonline.it 2002 - 2026
All Right Reserved
Created by Charlieonline.it
Any resemblance to any other tutorial is purely coincidental.
Please feel free to print it out for your own personal use.
But do not copy it in anyway to put on-line or re-write without permission.
This tutorial was written using PSP9,
but may be done with other versions,
and assumes you have a good working knowledge of PSP and its tools.
Tubes used for this tutorial are by Kat, Raz, LisaG e §Blaze_©BritaSeifert
and the copyright belongs to him/her.
Supplies needed: HERE
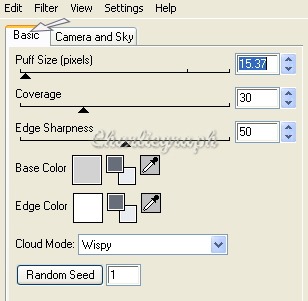
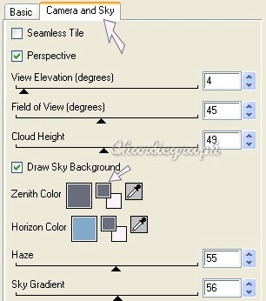
Plugin: Alien Skin Xenofex2 - Little Fluffy Clouds
Settings
Extract all the tubes to a folder of your choice, or in Psp and minimize them
Set the foreground to #676e79
and the background to #e9ecf1
Set the gradient as follows:

Remember to save often!
Let's begin!
Open a new transparent image 600x450 px;
Raster background checked; Color depth 16 million colors;
Flood fill with the gradient
Effects - Edge Effects - Enhance
Rename as Sfondo1
Add New Raster Layer
Effects - Plugins - Alien Skin Xenofex2 - Little Fluffy Clouds
click ok!
lower the opacity to 64 and rename as Sfondo2
Open raz2005_Misted_Angel, duplicate and close the original
Resize to 80%
Open the Freehand Selection Tool with this settings:
and select as following:

Copy (Ctrl + C), return to your working image,
Edit - Paste as New Layer.
Return on your tube
Selections - Select none.
Open again the Freehand Selection Tool with the previous settings
and select as follows:

Copy (Ctrl + C), return to your working image,
Edit - Paste as New Layer.
Duplicate and place it as finished.
Return to your tube
Selections - Select none
Open again the Freehand Selection Tool with the previous settings
and select some small portions of the sky
Copy (Ctrl + C), return to your working image,
Edit - Paste as New Layer.
Duplicate a lot of times and place it as you like. or as the following:

Open §Blaze_©BritaSeifert_Splendor,
Copy (Ctrl + C), return to your working image,
active layer Sfondo2 (make sure it is select)
Edit - Paste as New Layer.
place it as following:

Open KAT_2007_020248
Duplicate and close the original
Resize to 80% for 3 times
Open again the Freehand Selection Tool with the previous settings
and select as follows,

Selections - Invert
Adjust - Hue and Saturation - Colorize
with this settings:

Copy (Ctrl + C), return to your working image,
active your top layer
Edit - Paste as New Layer
Place it as finisced
Open LisaG__Tubes_FantasySeries_007
Copy (Ctrl + C), return to your working image,
Edit - Paste as New Layer.
If you like, apply a light colorize
Place it as finished.
Now add a border:
In the Materials Palette, change the Foreground to #26405c
and set the gradient:

Image - Add borders 5 px red colors
Open the Magic Wand
select borders and flood fill with the gradient.
Leaves selected!
Effects - 3D Effects - Drop Shadow

Repeat but change Horizontal and Vertical to -2
Selections - Select none..
Add your mark and save to .jpg
Written on March 2007
Return to Tutorials
Copyright © Charlieonline.it 2002 - 2026
All Right Reserved
Done!
I hope you have enjoyed this tutorial.
My Tutorials are Registered at TWI

If you have any questions, please write a message in to my "Contatti"
Copyright © Charlieonline.it 2002 - 2026
All Right Reserved
Back to top


Questo Sito è pubblicato sotto una Licenza (This website is licensed under a)
Creative Commons Attribuzione - Non commerciale - Non opere derivate 2.5 Italia License.
Pagina aggiornata... mercoledì 03 febbraio 2016
Tempo di caricamento 0.54 secondi.
Copyright © Charlieonline.it 2002 - 2026
Tutti i diritti riservati
Tempo di caricamento 0.54 secondi.
Copyright © Charlieonline.it 2002 - 2026
Tutti i diritti riservati