Tag Jeanne
Copyright © Charlieonline.it 2002 - 2026Tutti i diritti riservati
Return to Tutorials

Written by ©charlieonline graphics
but the copyright of the images used belong to their respective authors.
Copyright © Charlieonline.it 2002 - 2026
Tutti i diritti riservati
Please read my TOU's HERE
Dedicated to my friend JeanneThis is my way to thank her for her affection.
Jeanne, You are my big little angel!
A big hug, ketty
This tutorial, written by me, was born from an idea of my friend Jeanne.
Any resemblance to any other tutorial is purely coincidental.
Please feel free to print it out for your own personal use.
But do not copy it in anyway to put on-line or re-write without permission.
This tutorial was written using PSP9,
but may be done with other versions,
and assumes you have a good working knowledge of PSP and its tools.
Supplies needed: HERE
The tubes used for this tutorial are by Jeanne e Marif,
the bow is by Patry, but I have worked it out a little.
and Copyright belongs to them.
Selection and Tile are ©charlieonline graphics
You can find other Tiles or Textures HERE
For this tutorial we don't use Plugins but only Masks and Selecions.
My thanks to Marinella who tests my tutorials.
Her help is as usual valuable
Settings
Extract and open the tubes and minimize them to your Psp workspace for now.
Extract and save ch-tile-2020-5-2.jpg in the PSP/Pictures Tube Folder
Extract and save Iegn15.JPG in the PSP/Mask Folder
Set your Foreground color to #f6edf0
and the Background #5e689c
Remember to save often!
Let's begin!
1 - Open a new image 644px x 431px transparent background;
Raster background checked; Color depth 16 million colors
Flood fill with the foreground
Open Marif_2006_novembre_misted_decor0100
Copy, return to your working image and paste as New Layer
Resize to 80%, lower Opacity to 28,
and place it as the finished image
Open zwanen2 tube,
duplicate it and close the original
Adjust - Hue and Saturation - Colorize

Copy, return to your working image and paste as New Layer
lower Opacity to 40, and place it as finished image
2 - Add a New Raster Layer
In your ColourPalette change to Pattern and choose ch-tile-2020-5-2
Flood fill the layer
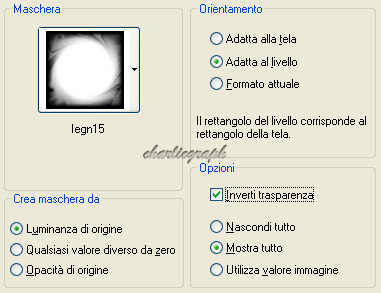
Layers - Load/Save Mask - Load Mask from Disk
choose Iegn15
Layers - Remove it
Do you want to merge Mask to layer? = Yes
Layers - Merge - Merge Group
Lower Opacity to 96
Layers - Merge - Visible
Put your work aside for a time!
3 - Open ch-selez-TagJeanne,
Duplicate and close the original
This will be our tag!
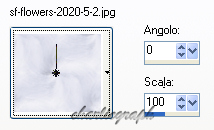
Return to Pattern and open again ch-tile-2020-5-2,
with the precedent settings, and flood fill your tag
Return to your precedent work
Edit - Copy
Return on your new tag
Edit - Paste as New Layer
Add a New Raster Layer and flood fill with your Pattern again
Add your Mask again
Layers - Load/Save Mask - Load Mask from Disk
choose Iegn15, with the precedent settings.
4 - Add a New Raster Layer
Selections - Load/Save Selections - Load Selection from Alpha Channel
open #Selezione1
Edit - Paste into Selection
(what you have in your memory,
that is to say the copy of your precedent work,
what you put aside)
Effects - 3D Effects - Drop Shadows
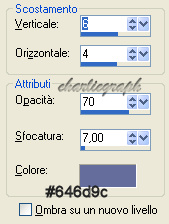
Repeat and change Horizontal and Vertical to -1
Selections - None
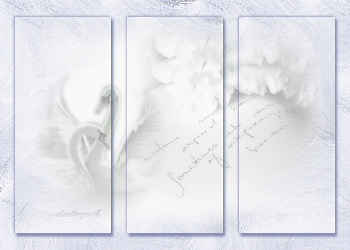
See below what you have to get
Open your Eraser Tool

and erase a bit on the swans and on the flowers as the finished image.
If you have followed the tutorial for well the two images,
the above and the below have to fit together.
5 - Add a New Raster Layer
Return again to Pattern, open again ch-tile-2020-5-2,
with the precedent settings, and flood fill your layer
Add your Mask again
Layers - Load/Save Mask - Load Mask from Disk
choose Iegn15, with the precedent settings.
Add your text and and borders as you like.
Add your watermark and save into .jpg
Done!
Hope you have enjoyed this tutorial.
Written on April 2008
Return to Tutorials
Copyright © Charlieonline.it 2002 - 2026
All Right Reserved
My Tutorials are Registered at TWI

If you have any questions, please write a message to my "Contatti"
Copyright © Charlieonline.it 2002 - 2026
All Right Reserved
Back to top


Questo Sito è pubblicato sotto una Licenza (This website is licensed under a)
Creative Commons Attribuzione - Non commerciale - Non opere derivate 2.5 Italia License.
Pagina aggiornata... martedì 02 febbraio 2016
Tempo di caricamento 0.27 secondi.
Copyright © Charlieonline.it 2002 - 2026
Tutti i diritti riservati
Tempo di caricamento 0.27 secondi.
Copyright © Charlieonline.it 2002 - 2026
Tutti i diritti riservati