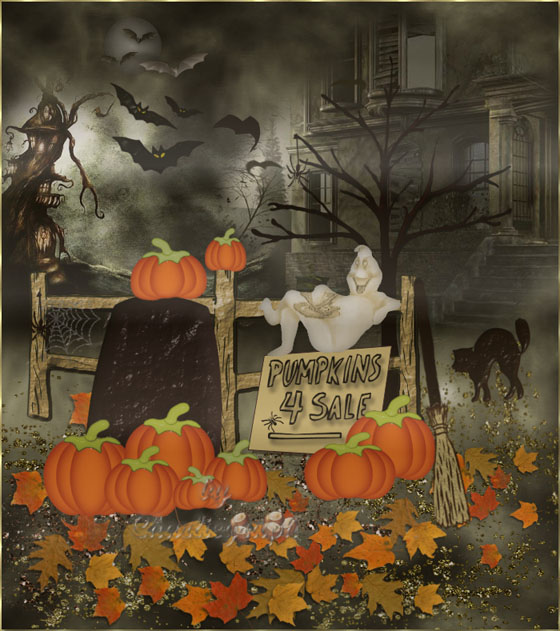
Tag Pumpkins 4 Sale
Copyright © Charlieonline.it 2002 - 2025Tutti i diritti riservati
TutorialsPSP
Please read my TOU's HERE
Copyright © Charlieonline.it 2002 - 2025
Tutti i diritti riservati
Tutorial written by Charlieonline.it
Any resemblance to any other tutorial is purely coincidental.
Please feel free to print it out for your own personal use.
But do not copy it in anyway to put on-line, pass out,
or re-write or translate without permission.
Besides you may not script it and sell the script.
You may not sell works from my Presets or Tutorials
All my works are for personal use only, and with no profit-websites
A link to this site's required! Thank you!
This tutorial was written using PSP9,
but may be done with other versions,
and assumes you have a good working knowledge of PSP and its tools.
I found all the supplies on the net,
and I don't know who are the tubers, but the copyright belongs to him/her.
Supplies needed.....HERE
Plugins
I.C.Net Software - Filters Unlimited2 - Render - Fore-/Background colorsAlienSkin EyeCandy5 - Impact - Bevel - Carved Stone
Preparation
Set your Foreground to #0b0b09
and Background to #97977b
Extract and open all the files in the Supplies
and minimize them to your Psp workspace
Save the Gradient in the Gradient folder
and the AutumnLeaves tube in the Picture Tube folder
Remember to save often.
Let's begin!
1 - Create a New Transparent Image 700x790 pixel - 300 DPI
Raster Background checked - 16 million colors
Flood fill with Foreground color
Effects - Plugins - Filters Unlimited2 - Render - Fore-/Background color
Here are my settings:

Rename it background
2 - Open the dark_sky.pspimage
Copy and paste in your working design
Place it on the top left of your design

Duplicate
Image - Mirror
3 - Open the rw-octobernight~misted.psp
Copy and paste in your working design
Place it on the left of your design
under the dark-sky
as the image below
4 - Open the landscape166.psp
Copy and paste in your working design
Place it on the right of the octobernight image
You will have something similar to this

Adjust - Brightness and Contrast
Gamma Correction
Here are my settings:

Rename landscape166
5 - Open the ghost-moon-bat.pspimage
and choose the moon
copy and paste in your working design
Place it above the octobernight image
See finished work as example
Return on the ghost-moon-bat.pspimage again
copy the bat and the bats (one by one of course!-))
and paste on your working design
Place them between the octobernight and the landscape166 images
Look at the finished work for reference
Minimize the ghost-moon-bat.pspimage for now
6 - Open my supplies xPumpkins4Sale.pspimage
Choose the fence,
copy and paste on your working design
Place it under the octobernight image
Use the finished work as example
Your image should be like this

7 - Select your Rectangle tool
and with your Foreground to null
and Background to #2f181d
draw out a rectangle setting like this

Transform to path
and push the nodes till to have something like this

Convert to Raster Layer
Rename as rock
Effets -Plugins - AlienSkin EyeCandy5 - Impact - Bevel - Carved Stone
with default settings
Select the Dodge tool on the left
with default settings, and clear up a little bit the right side
Then use the Burn tool to darken the left side
8 - Open again your rectangle tool
Leave the same color to Background,
unclose your foreground again and set to #e3ca83
Switch Foreground/Background and draw a rectangle with these settings

Convert to Path
and shape the node till to obtain one similar to this

Convert to Raster Layer
Rename as sign-board
Add a DropShadow
4 - 5 - 47 - 1 - color black
or other to your own liking
Return on my supplies xPumpkins4Sale.pspimage again
Choose the text, and the littlebat
copy and paste them on your working design
Place them upon the sign-board like in the finished work
9 - Open again the ghost-moon-bat.pspimage
choose the ghost
copy and paste on your working design
Place it above the sign-board like in the finished work
Now you can close the ghost-moon-bat.pspimage
10 - Highlight the landscape166 layer
In my supplies xPumpkins4Sale.pspimage
Choose the tree,
copy, and paste on your working design,
Place it under the octobernight image
Use the finished work as example
Your image should be something similar to this

Highlight the background layer again
11 - In my supplies xPumpkins4Sale.pspimage
Choose the glitted1 and glitted2,
copy, and paste on your working design,
Place them here and there on your canvas
Then Open the Picture Tube tool and search for the leaves
Place them on your canvas here and there with several size
Look at the finished work for reference
Highlight the top layer (the ghost) again
12 - Return on my supplies xPumpkins4Sale.pspimage Select the kat and after the bloom,
copy, and paste on your working design,
Place them in the right position
Look at the finished work for reference
Then copy spider1 and spider2
and paste them on your design
Place them the 1st on the tree
and the 2nd in the left stake of the fence as finished work
At last the spider's web
Place it in the top corner on the left side of the fence
.....the chestnuts
and also bat1 and bat2
Use the finished work as example
to place all the elements in the right position
Ah...... forgot the Pumpkins!
ahahahahahah
13 - Return to my supplies xPumpkins4Sale.pspimage
and choose the Pumpkin
copy, and paste it on your working design
Looking at my finished work, you realize there are a lot of pumpkins on it
so you have to duplicate it as many time as you need or like
and besides using the Deformation tool or the Warp Brush
to push or resize them in several sizes.
Don't forget to sharpen after each deformation
Therefore, move the pumpkin you pasted before, in the right position.
It is the big one, so look at the finished work to place it
Then duplicate it as many time as you need
and use the Move tool to place them wherever you like
or
Using the finished work as example
if you like my work
When you are satisfied on it,
and all elements are in the right position
Layers - Merge Visible
As you see the result it is too shining for an Halloween image so ...
What do you think to dark it a little bit?
14 - Add a new Raster Layer
In your Style Palette set the Foreground to #857558
and Background to #392d19
change to Gradients
and choose Gradazioni di marrone.PspGradient
(I think it is by default, but I attached it all the same)
I use these settings:
Angle 0 - Repeat 0
Invert not checked
Flood fill your layer
and low the Opacity to 36%
If you like add a little border
I used a chrome gradient of 1 px
Add your watermark, and Export as .jpg
WooHoo!
You have done!
Hope you have enjoyed this tutorial.
Thanks for giving it a try, and hope you enjoyed it!
Written at the end of September 2010
Return to Tutorials
Copyright © Charlieonline.it 2002 - 2025
All Right Reserved
My Tutorials are Registered at TWI

If you have any questions, please write a message to my "Contatti"
Copyright © Charlieonline.it 2002 - 2025
All Right Reserved
Back to top


Questo Sito è pubblicato sotto una Licenza (This website is licensed under a)
Creative Commons Attribuzione - Non commerciale - Non opere derivate 2.5 Italia License.
Pagina aggiornata... domenica 14 febbraio 2016
Tempo di caricamento 0.08 secondi.
Copyright © Charlieonline.it 2002 - 2025
Tutti i diritti riservati
Tempo di caricamento 0.08 secondi.
Copyright © Charlieonline.it 2002 - 2025
Tutti i diritti riservati