Tag I Love Cristmas - PS
Copyright © Charlieonline.it 2002 - 2026Tutti i diritti riservati
Return to Tutorials

Tutorial written by ©charlieonline graphics
©Images copyright belong to the original artist.
Copyright © Charlieonline.it 2002 - 2026
Tutti i diritti riservati
Please read my TOU's HERE
I write this tutorial also en PSP.......HERE
Any resemblance to any other tutorial is purely coincidental.
Please feel free to link to this tutorial,
and/or print it out for your own personal use,
BUT do not upload, share, or re-write or translate it without permission.
Besides you may not script it and sell the script.
You may not sell works from my Presets or Tutorials
All my works are for personal use only, and with no profit-websites
A link to this site's required!
Thank you!
This tutorial was written using PS Cs5
but may be done with other versions.
It would take a little basic knowledge to run it.
This page's tile is
Copyright © Charlieonline.it 2002 - 2026
Tutti i diritti riservati
You can find other Tiles or Textures..... HERE
Tubes made by Gini, MC, JB(Judy) and CherSwitz
Copyright belongs to them.
Note: I transformed all tubes in png format for
using them also in Photoshop
Some of them are also snowed by me in PS and
its tool and Plugins
The SnowAnimation is by Bieke but I reworked it on gif format
and trasformed it to use for a PS Animation
Please leave all credits intact!
| Supplies needed: |
|
Filter: AlienSkin EyeCandy 5-Nature/SnowDrift
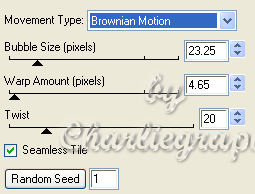
EyeCandy4/Jiggle
Settings
Extract and save the brush_WinterMagicTut.abr
to the brush folder of PS or other of your choice
Save my ch-small snow.f1s settings for SnowDrift
in a folder of your choice
Extract and open all the supplies
and minimize them to your Ps workspace
Open the ch-snowanimation2.gif to PS
Save the snowflakes.abr in the Brushes folder of PS
Note: Attached to the rar/supplies
there is a file named:
SnowedCharlieonlineElements_LoveChristmasTutorial.psd
it contains all the elements used in this tutorials and already snowed using
Filter - AlienSkin EyeCandy 5-Nature/SnowDrift
Now .....
Let's begin!
1 - Open a new transparent canvas 980w x 760h
Rename as Sky
Set your Foreground color to#747d81 and the Background to #aeb2b2
Filter - Render Clouds
2 - At the bottom of the Layer Palette click the 'Create New Layer' button
and rename as sun
Open your Elliptical Marquee Tool
match your setting as mine
and draw out a selection like this

Change the foreground to #d7d18b and background to #f3edbb
Filter - Render Clouds
Your image should look like this

Select - Deselect
3 - Create a New Layer
and rename as basicsnow
Change your foreground to white
Open the Polygonal Lasso Tool
and draw out a selection like this

Scroll through the brush tip previews
and find the Large Snow Underline brush tip
Click to select it

Keep the same settings
Move your brush onto your selection
(use the finish work as example) and brush your canvas till to have something similar to this

Note: For the basicsnow you can use also Filter - EyeCandy4/Jiggle
In this case flood fill your selection with White colour
and apply the plugin settings as follow
Edit - Transform - Scale
Change W: and H: to 105%. With the Move tool move the white image
and using the Polygonal Lasso tool delete all the surplus
as in the follow image

When you have erased what is superfluous
deselect and replace the basicsnow in the right position
Go ahead!
4 - Create a New Layer
and rename as snow
Select your brush tip previews again
and loock for the Light Snow brush tip
Click to select it

Keep the same settings
Move your brush onto your canvas and brush it till to have something similar to this

Layer - Merge visible
This will be your working canvas!
Now we go to add all the elements attached to the supplies
5 - Open theChristmasScene_MistedByGini.png
Erase Gini watermark and
with your Move Tool drag it on your working design
Place it on the left of the sun,
like the finished work.
6 - *Filter - AlienSkin EyeCandy 5-Nature/SnowDrift - Small, First Flakes
with default settings*
Note: If you don't have this Filter, attached to my supplies
there are all the snowed and resized images in a file named
SnowedCharlieonlineElements_LoveChristmasTutorial.psd
7 - Open the cc_NorthPoleMan.png
with your Move Tool drag it on your working design
Edit - Transform - Scale
change width and height(W: and H:) to 80
place it above the mail box of the XmasScene,
just to wrap it up, use as example the finished work.
Repeat step 6 * *
or use my snowed and resized one fromSnowedCharlieonlineElements_LoveChristmasTutorial.psd
8 - Open the CherSwitz_SnowmanTiredTopper.png,
Image - Image Size
Resize at 40%

With your Move Tool drag it on your working design
Place it at the front of cc_NorthPoleMan
as the finished work.
Repeat step 6 * *
or use my snowed and resized one fromSnowedCharlieonlineElements_LoveChristmasTutorial.psd
Open the CherSwitz~doyouseewhatisee2.png
Image - Image Size
Resize at 50%
With your Move Tool drag it on your working design
And place it on the left of the snowman
as the finished work.
Repeat step 6 * *
or use my snowed and resized one fromSnowedCharlieonlineElements_LoveChristmasTutorial.psd
That is what you have had till now:

Open all the trees of the file
SnowedCharlieonlineElements_LoveChristmasTutorial.psd
With your Move Tool drag each one on your working design
Use finished as example to place them
Note: Unfortunately I don't remember where I downloaded these trees,
but all rights © and property are acknowledged to their owners,
and I not claim any right over them.
9 - Open the JB_tiny Santa.psp and the gift_tutorial-snowed
With your Move Tool drag and place it on your working design
as finished work.
Open the MC_Love Christmas-Holly&Stars_10-06~pjs-snowed
With your Move Tool drag and place it on your working design
as finished work.
Put all the other elements in the right position
and apply the Snow Drift plugin if you don't use my snowed elements
Now
Put your name or watermark
Add a little border if you like
At this point
Open again the Light Snow brush tip
change Size to 298 px
or other of your choise
and add some brush on your design till to have something similar to this

Merge all the layer
Now if you like you can use it so or animate it with a little snow
In this case......go ahead
10 - Open ch-snowanimation2.gif
Image - Duplicate
Close the original
Note: The ch-snowanimation2.gif file
consit of 10 layers snowed and it is already prepared from me
to use it on PS animation, for an image sizes W:437px x H:322 px
so you have to resize your image to these settings
Image - Image Size

Width: 437px and Height: 322px
Deselect Constrain Proportion
Note: In the supplies I added also a big animation gif sized: 760x600 px
named ch-snow760x600.gif if you like to use it in a big one.
11 - When you resized the image you have just finished creating
and drag it on your ch-snowanimation2.gif
Layer - Arrange - Send to back

Now Open the Animation palette from Window - Animation
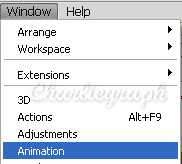
you have to had this one

Click the play animation button and watch how the animation played
For me it's ok
Otherwise you can expand the 0,1 sec button in the bottom panel
and select 0.2 sec or other time from the fly-out menu.
Change the delay time of each frame at your wish
Note: Some people have written me this tutorial doesn't work with CS3,
in this case you can follow the explanation
of this other tutorial I wrote for basic animation.
*~*~Tut-PS-CreateAnimation*~*~
In this case you can use the psd format of the snow gif in the supplies,
and following the explanations of the CreateAnimation basic tutorial,
you have to make 10 frames
playing with the Layer Palette and the Animation Panel
But you have to pay close attention
When you are satisfied with the result,
and all has been set up,
close the Animation Panel!
It's time to save the image!
Go up to:
File - Save for Web & Devices
with Default settings
but make sure the file format is set to gif
and save the image!
Save a copy in .psd format too , it might serve you for another time
Done!
I hope you enjoyed this tutorial.
If you have questions or need clarification
post a message to my Contacts.
Written en PSP for Christmas 2010
Rewritten en Photoshop for Christmas 2011
A special thank to my good friend "Laurie"
She has always been my tester since I started making Photoshop tutorials
Hugsssssssssssss
My Tutorials are Registered at TWI

Per informazioni o suggerimenti
If you like write a message to my "Contatti"
Se hai dubbi o ti servono chiarimenti posta un messaggio nei "Contatti"
Copyright © Charlieonline.it 2002 - 2026
Tutti i diritti riservati
Torna all'inizio


Questo Sito è pubblicato sotto una Licenza (This website is licensed under a)
Creative Commons Attribuzione - Non commerciale - Non opere derivate 2.5 Italia License.
Pagina aggiornata... lunedì 23 novembre 2015
Tempo di caricamento 0.86 secondi.
Copyright © Charlieonline.it 2002 - 2026
Tutti i diritti riservati